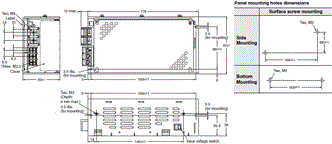
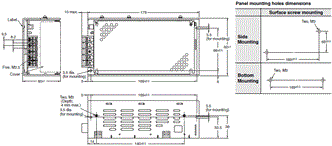
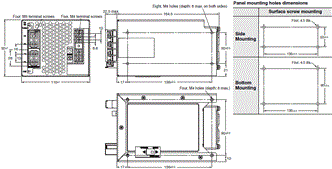
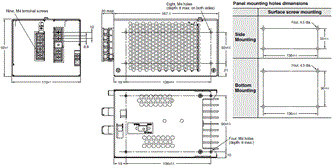
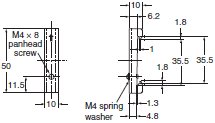
Temporarily attach the enclosed mounting bracket as shown in the illustration on the right, hook the holes (parts a) in the Power Supply on hooks on the mounting bracket (parts b), and secure the Power Supply with two mounting screws.
S8JX
Switch Mode Power Supply (15/35/50/100/150/300/600-W Models)
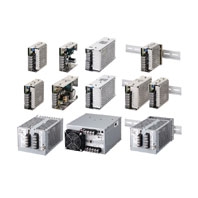
Flexible Selection of Reliability and Ease of Operation with the S8JX. New Models with Harmonic Current Suppression for a Broader Lineup.
about this Product Family
- Features
- Lineup
- Specifications
- Dimensions
- Catalog
last update: March 10, 2016
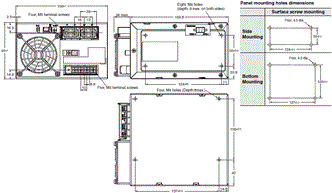
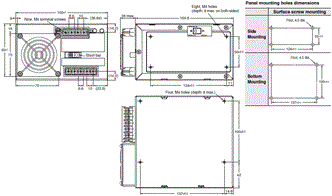
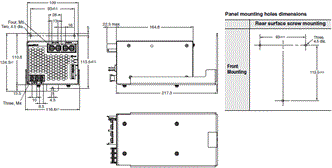
Caution: All units are in millimeters unless otherwise indicated.
S8JX-G
Front-mounting Models
S8JX-G015[][] (15 W)
S8JX-G015[][]C (15 W)
S8JX-G035[][] (35 W)
S8JX-G035[][]C (35 W)
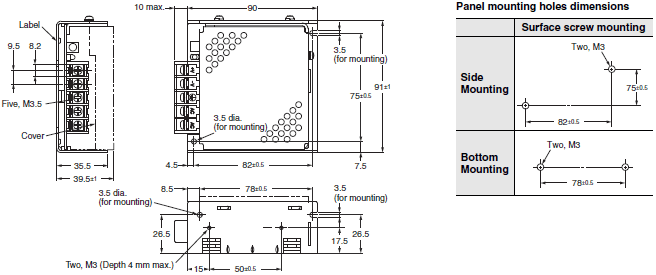
S8JX-G050[][] (50 W)
S8JX-G050[][]C (50 W)
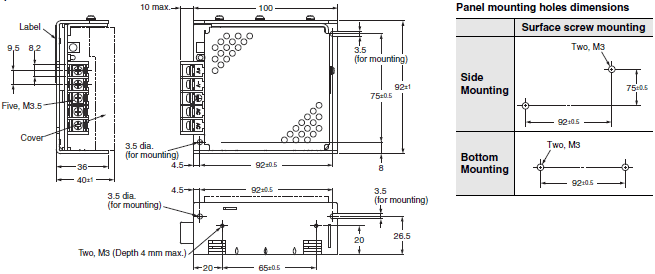
S8JX-G100[][] (100 W)
S8JX-G100[][]C (100 W)
S8JX-G15024 (150 W)
S8JX-G15024C (150 W)
S8JX-G15048 (150 W)
S8JX-G15048C (150 W)
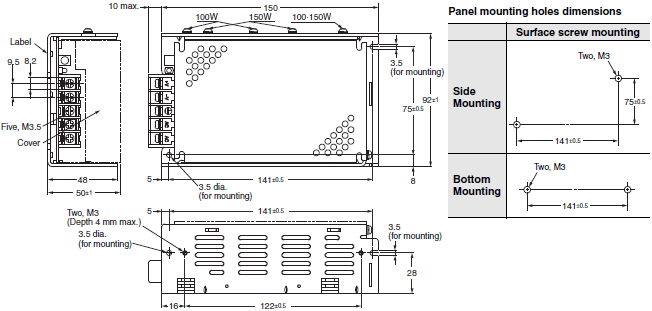
S8JX-G15005 (150 W)
S8JX-G15005C (150 W)
S8JX-G15012 (150 W)
S8JX-G15012C (150 W)
S8JX-G30005C (300 W)
S8JX-G30012C (300 W)
S8JX-G30024C (300 W)
S8JX-G30048C (300 W)
S8JX-G60005[] (600 W)
S8JX-G60012[] (600 W)
S8JX-G60024C (600 W)
S8JX-G60048C (600 W)
Mounting Bracket Provided with Front-mounting Power Supplies (A)
15-/35-/50-/100-/150-W Models
S82Y-J00F Front-mounting Bracket
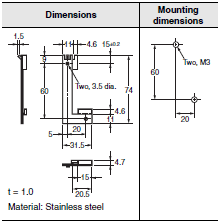
Front-mounting Method
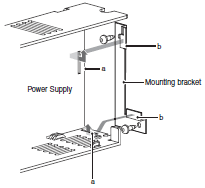
Note: Mounting screws are not provided.
300-/600-W Models
Front-mounting Bracket (S82Y-J30F)
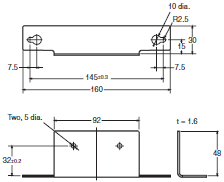
Note: Mounting Brackets are provided in a set, one for the right side and one for the left side.
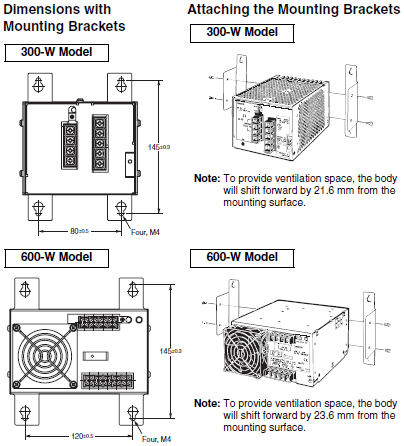
Separately purchasable mounting brackets
(Please ask your dealer for details of delivery.)
For 30-W/50-W/100-W/150-W/300-W/600-W models (separately purchasable)
Bracket for changeover from S82J-series
The mounting-hole pitch of mounting brackets A - I below is identical to that of our product S82J. These brackets can be used for switchover with the S82J-series.
Note:Mounting brackets (A, B, C, D, E, F, G, H, I) are compatible with S82J mounting holes.
Mounting Bracket A
S82Y-JX05B
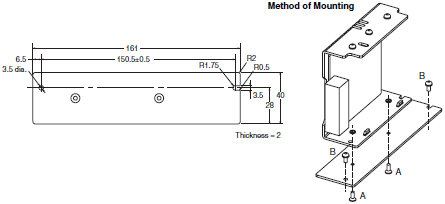
A: Accessories (2 locations)
Be sure to use the accessory screws.
Mounting screw tightening torque (recommended): 0.49 Nm
B: M3 (2 locations)
Mounting Bracket B
S82Y-JX10B
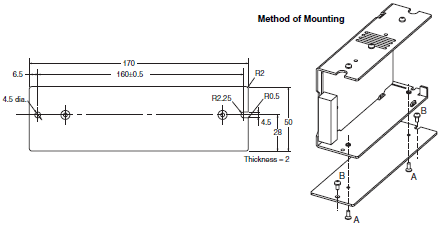
A: Accessories (2 locations)
Be sure to use the accessory screws.
Mounting screw tightening torque (recommended): 0.49 Nm
B: M4 (2 locations)
Mounting Bracket C
S82Y-JX15B
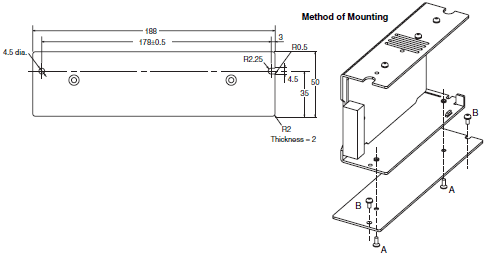
A: Accessories (2 locations)
Be sure to use the accessory screws.
Mounting screw tightening torque (recommended): 0.49 Nm
B: M4 (2 locations)
Mounting Bracket D
S82Y-JX15F
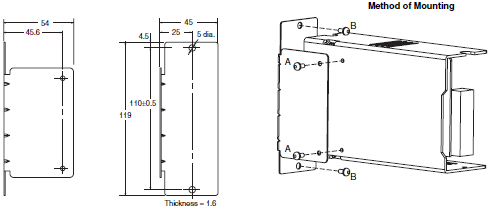
A: Accessories (2 locations)
Be sure to use the accessory screws.
Mounting screw tightening torque (recommended): 0.49 Nm
B: M4 (2 locations)
Mounting Bracket E
S82Y-JX03B
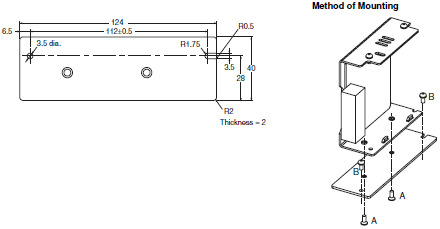
A: Accessories (2 locations)
Be sure to use the accessory screws.
Mounting screw tightening torque (recommended): 0.49 Nm
B: M3 (2 locations)
Mounting Bracket F
S82Y-JX30B
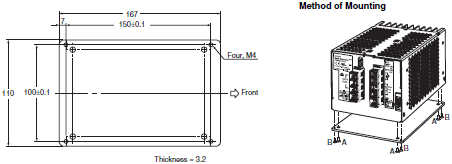
A: Accessories (4 locations)
Be sure to use the accessory screws.
B: M4 (4 locations)
Screws of a length that will not project beyond the fixture (thickness: 3.2 mm) should be selected.
Mounting Bracket G
S82Y-JX30F

A: Accessories (4 locations)
Be sure to use the accessory screws.
Note: For ventilation of the back surface, the body should be placed 21.6 mm in front of the mounting side.
Mounting Bracket H
S82Y-JX60B
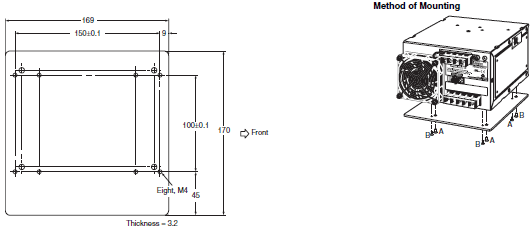
A: Accessories (4 locations)
Be sure to use the accessory screws.
B: M4 (4 locations)
Screws of a length that will not project beyond the fixture (thickness: 3.2 mm) should be selected. (Although there
are 8 holes in the bracket body, only 4 of these are used.)
Mounting Bracket I
S82Y-JX60F

Screws used
A: Accessories (4 locations)
Be sure to use the accessory screws.
Note: For ventilation of the back surface, the body should be placed 23.6 mm in front of the mounting side.
DIN Rail-mounting Models
S8JX-G015[][]D (15 W)
S8JX-G015[][]CD (15 W)
S8JX-G035[][]D (35 W)
S8JX-G035[][]CD (35 W)
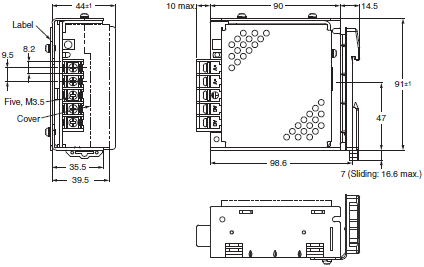
S8JX-G050[][]D (50 W)
S8JX-G050[][]CD (50 W)
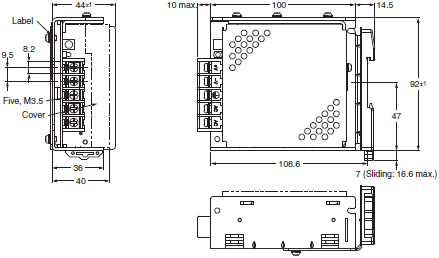
S8JX-G100[][]D (100 W)
S8JX-G100[][]CD (100 W)
S8JX-G15024D (150 W)
S8JX-G15024CD (150 W)
S8JX-G15048D (150 W)
S8JX-G15048CD (150 W)
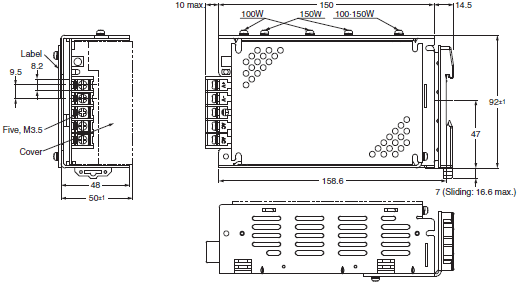
S8JX-G15005D (150 W)
S8JX-G15005CD (150 W)
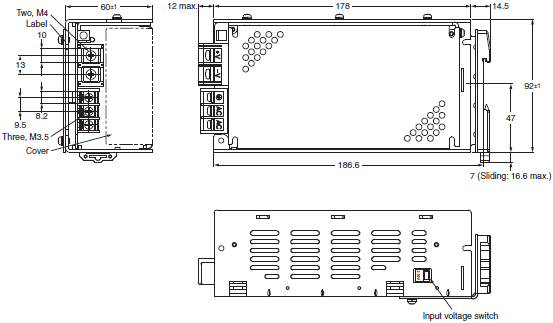
S8JX-G15012D (150 W)
S8JX-G15012CD (150 W)
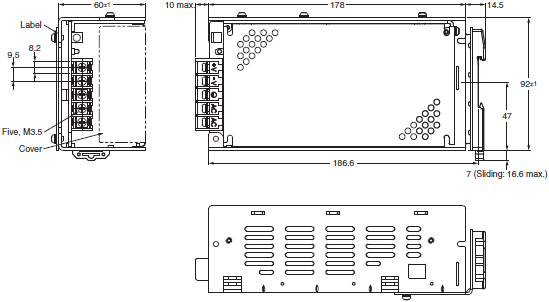
S8JX-G30005CD (300W)
S8JX-G30012CD (300W)
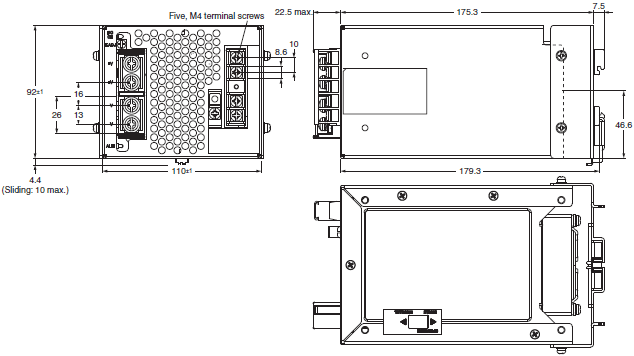
Note: Use a metal DIN Rail when mounting a 300-W model to a DIN Rail.
S8JX-G30024CD (300 W)
S8JX-G30048CD (300 W)
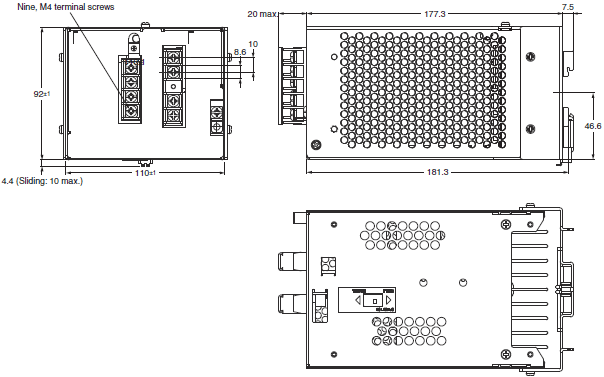
Note: Use a metal DIN Rail when mounting a 300-W model to a DIN Rail.
DIN Rail (Order Separately)
Mounting Rail (Material: Aluminum)

* Value in parentheses are for PFP-50N.
Mounting Rail (Material: Aluminum)

End Plate
filings may result from aluminum abrasion.
Unit.
S8JX-P
Front-mounting Models
S8JX-P050[][] (50 W)
S8JX-P050[][]C (50 W)
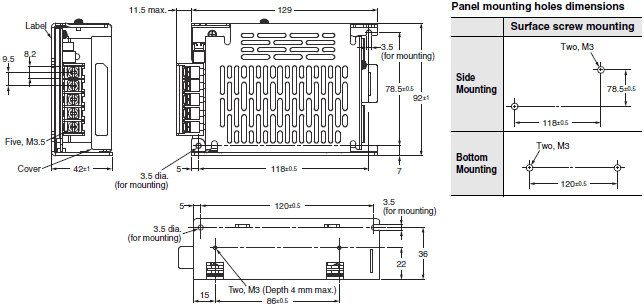
S8JX-P100[][] (100 W)
S8JX-P100[][]C (100 W)
S8JX-P15012 (150 W)
S8JX-P15012C (150 W)
S8JX-P15024 (150 W)
S8JX-P15024C (150 W)
S8JX-P15048 (150 W)
S8JX-P15048C (150 W)
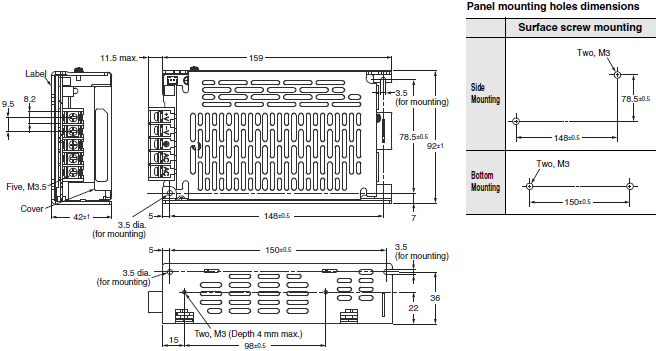
S8JX-P15005 (150 W)
S8JX-P15005C (150 W)
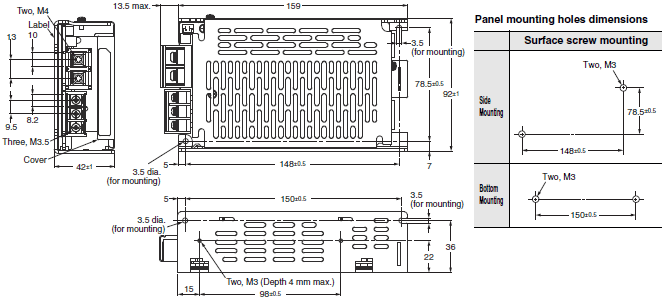
S8JX-P300[][]C (300 W)
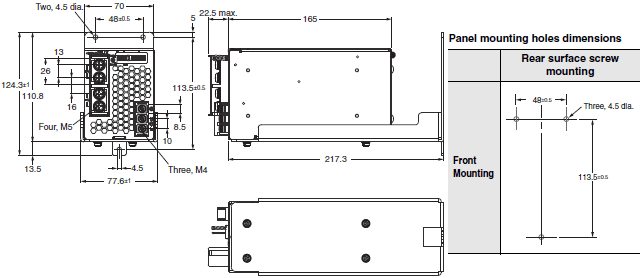
S8JX-P300[][]N (300 W)
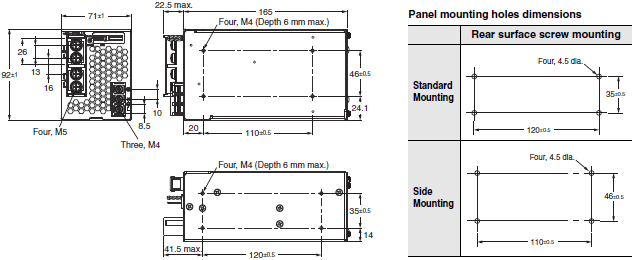
S8JX-P600[][]C (600 W)
S8JX-P600[][]N (600 W)
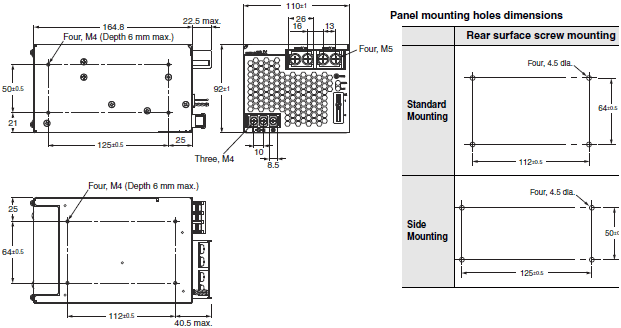
DIN Rail-mounting Models
S8JX-P050[][]D (50 W)
S8JX-P050[][]CD (50 W)
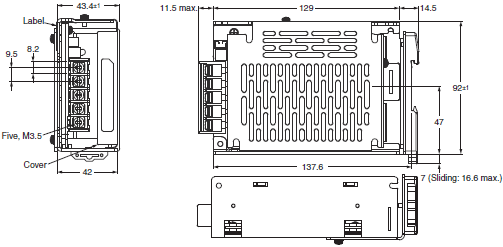
S8JX-P100[][]D (100 W)
S8JX-P100[][]CD (100 W)
S8JX-P15012D (150 W)
S8JX-P15012CD (150 W)
S8JX-P15024D (150 W)
S8JX-P15024CD (150 W)
S8JX-P15048D (150 W)
S8JX-P15048CD (150 W)
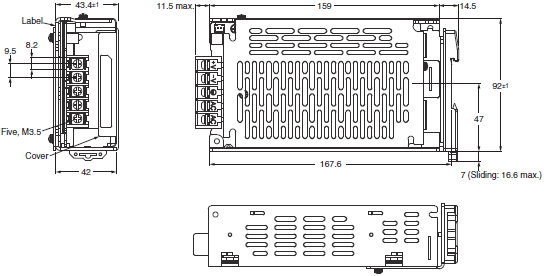
S8JX-P15005D (150 W)
S8JX-P15005CD (150 W)
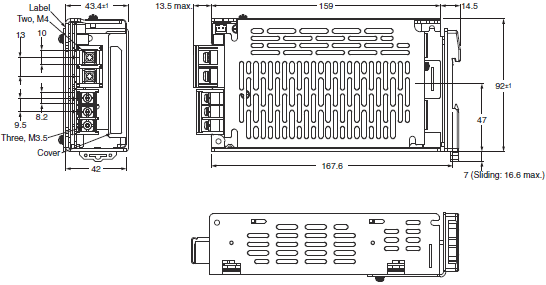
S8JX-P300[][]CD (300 W)
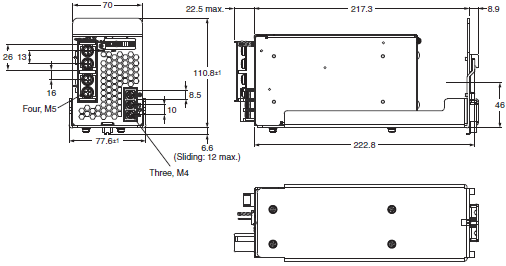
Note: Use a metal DIN Rail when mounting a 300-W model to a DIN Rail.
S8JX-P600[][]CD (600 W)
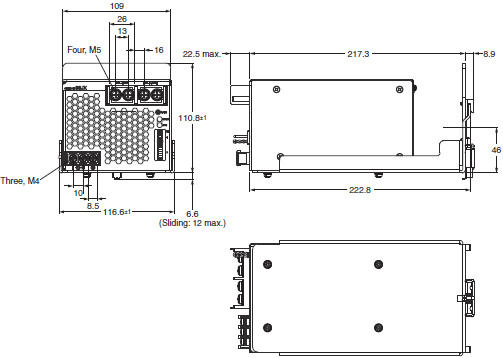
Note: Use a metal DIN Rail when mounting a 600-W model to a DIN Rail.
Mounting Bracket Provided with Front-mounting Power Supplies (A)
50-/100-/150-W Models
S82Y-J00F Front-mounting Bracket
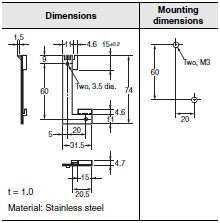
Front-mounting Method
Temporarily attach the enclosed mounting bracket as shown in the illustration on the right, hook the holes (parts a) in the Power Supply on hooks on the mounting bracket (parts b), and secure the Power Supply with two mounting screws.
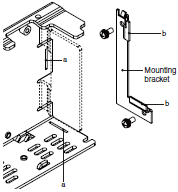
Note: Mounting screws are not provided.
DIN Rail (Order Separately)
Mounting Rail (Material: Aluminum)

* Value in parentheses are for PFP-50N.
Mounting Rail (Material: Aluminum)

End Plate
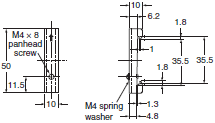
filings may result from aluminum abrasion.
Unit.
last update: March 10, 2016


