Safety Components
Hazards Generated by Machinery,Strategies for Selecting Safety Measures,
| Introduction |
|
| Explanation of Terms | Troubleshooting |
|
|
|
|
|
|
-
 What Is a Safety Component?
-
 Safety Components
-
 OMRON products
-
 Interlocking movable guards
-
 Emergency Stop Device
-
 Safety Sensor
-
 Safety Controller
-
 Safety-related Operating Switches
-
 Safety Relays
-
 Drive Devices Equipped with the Safety Function
What Is a Safety Component?
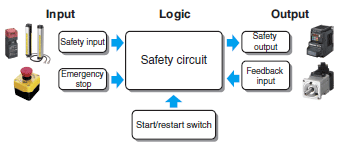
Safety components are used to construct safety-related control systems that ensure safety in machinery.
Definitions in the Machinery Directive
Safety components are defined in the broadest sense as shown below according to Article 2 of the Machinery Directive.
(1) Parts provided to ensure safety functions.
(2) Parts distributed independently within markets.
(3) A part that poses a threat to the safety of operators if damaged or functionally imperfect.
(4) A part that is unnecessary for the machine to work or its function can be achieved with a normal component.
Items Specified in the Machinery Directive
The following items are designated safety components in the Annex V. Refer to the Machinery Directive for details.
• Protective devices to detect operators
• Power interlock guards related to Annex IV 9 10 11
• Logic units that ensure safety functions
• Emergency stop devices
• Two-hand control devices
OMRON’s View of Safety Components
OMRON generically defines safety components as parts in the broadest meaning as previously mentioned as well as safety-related parts that are stipulated for use in safety circuits.
The Function of Safety Components
Control systems that affect safety must be designed to minimize the possibility of danger occurring even when there is a failure in an interlocking device. Safety devices are equipped with functions such as a direct opening action for switches and a forcibly guided mechanism for relays, as required by standards. These functions are designed to operate correctly within the control system in which they are used.
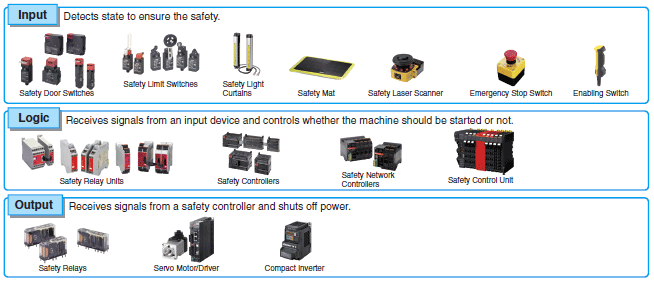
The following describes safety components that are commonly used to develop safety functions.
Safety Components
OMRON products
Interlocking movable guards
These devices prevent workers from entering in hazardous machine areas.
They detect whether or not fences or doors are not opened and, if opened, stop machines before operators are injured.
(1) Basic elements of the safety switch
The safety switch has the following functions and structures and ensures safe operation even when there is a failure.
The functions and structures required for the safety switch are as follows:
Direct Opening Action (IEC 60947-5-1)
This is a mechanism where contacts can be opened through the pressing operation even if a contact is welded.
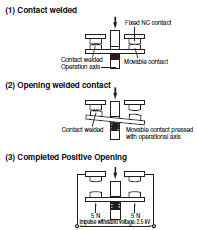
The contacts must withstand the impulse voltage specified by IEC 60947-5-1 after the contacts have been forcibly opened with the positive operating force (POF) and positive overtravel (POT) exceeding the contact welding force, which is equivalent to 10 N.
Formlock Mechanism of Safety Limit Switch
This is a mechanism that can prevent actuators from failing.
The actuator for the safety limit switch must not be deformed or displaced by a strong force which may be applied on it when a contact is welded so that the positive opening works correctly.
Therefore the safety limit switch has a direct opening action that consists of inelastic, uneven parts engaged with one another. The following figure shows the example of the mechanism with the axis of rotation and the lever.
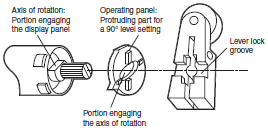
Note: The lever is secured with uneven parts so that the lever will not fail if a strong force is applied to it. The lever cannot be attached backwards.
Structure not easily defeated
"Defeating" means intentionally disabling the safety effects.
The safety switch has a structure not easily defeated.
For more details, see (2) Guard interlock switch.
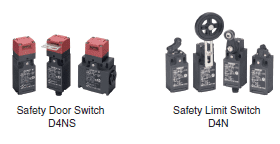
(2) Guard Interlock Switch
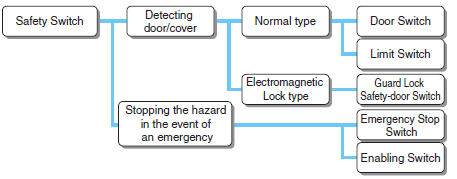
The guard interlock switch detects that a fence and/or door provided for preventing operators from entering in hazardous machine areas is opened, and stops the machine before operators are injured. Switches such as safety door switch and safety limit switches are classified as the guard interlock switch.
1) Guard Monitoring and Interlocking
Guard monitoring and interlocking switches are one of the most important types of protective devices to prevent dangerous situations by shutting power off from the machine.
When it is decided to protect the machine with fences, we must be sure that the only way inside the dangerous area is through the guard. If the guard is opened, a mechanically actuated position detector stops the machine. Every guard must have position detector switches to ensure the safety of personnel. A basic requirement is that if the door is opened, the machine must stop before anyone can reach the hazardous moving parts of the machine.
The most import selection criteria of an interlocking device are:
• the conditions of use and intended use (ISO 12100)
• the hazard present at the machine (ISO 12100)
• the severity of the possible harm
• the probability of failure of the interlocking device
• stopping time and access time considerations
• the frequency of access
• the duration of person’s exposure to the hazard
• performance considerations
The position switch shall be actuated in positive mode (for more details, refer to the section "Negative operation and Positive operation"). The break contact of the position switch shall be of the "direct opening action" type. (IEC60947-5-1)
The security of an interlock switch is dependent on its ability to withstand attempts to "cheat" or defeat the mechanism. An interlock switch should be designed so that is cannot be defeated in a simple manner. "Defeating in a simple manner" is an illegal nullification by measures other than valid mode changing procedure using an operating switch etc. For example, the following readily available objects can be used as a defeating tool:
• screws, needles, sheet-metal pieces;
• objects in daily use such as keys, coins, tools required for the intended use of the machine
2) Standards for guard interlock switches (ISO 14119)
ISO 14119 "Interlocking devices associated with guards" provides the designing standards for interlocking devices. To design interlocking switches and interlocking circuits, ISO 13849-1 must be conformed.
3) Requirements for Guard Monitoring
Interlocking guards must ensure that the safety door protects the hazardous area as defined in ISO 12100.
The sensors and the signal processing must comply with all required norms and directives.
• Switches shall be designed to withstand all expected and foreseeable stresses
• Switches shall comply with safety standards, especially, direct opening action and safety door switches shall be completely equipped.
• The principles of redundancy and diversity shall be considered in the mechanical design of switches and signal processing, if necessary.
• Safety-related parts in the associated control circuit must meet at least the required level (PLr) defined in the risk assessment.
4) Requirements for Guard Locking
An interlocking device with a guard locking shall be used when the stopping time is greater than the access time taken by a person to reach the danger zone.
The interlocking device with a guard locking is intended to lock a guard in the closed position and linked to a control system so that:
• the machine cannot operate until the guard is closed and locked;
• the guard remains locked until the risk has passed.
For applications requiring frequent access, the interlocking device shall be chosen to provide the least possible hindrance to the operation of the guard.
Because the guard might be defeated, requirements of intended use, conditions of use, risk assessment and stopping time and access time must be taken into account. In some cases to reduce the frequency of guard opening/closing, the machine processes must be reviewed.
5) Interlocking devices
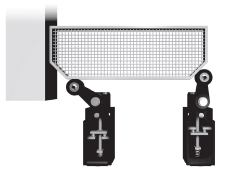
1. Cam operated actuation
When one single safety switch is used it shall be installed to actuate in positive mode to prevent the safety switch from being defeated in a simple manner. A higher level safety protection against defeat can be achieved, e.g., by enclosing the cam and safety switch in the same housing.
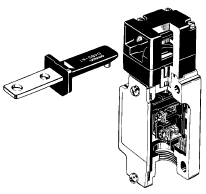
2. Tongue-actuated operation
The tongue-actuated operation switch requires a dedicated tongue and can prevent easy cheating of the switch.
However care should be taken because it can be defeated by using a spare tongue.
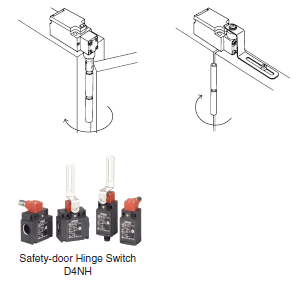
3. Hinge operated actuation
Hinged door switches have two features. One is that it is difficult to defeat the switch. The other is that it can be used for small size guards thanks to no limitation to tongue radius as opposed to operation key operated switches. Prior confirmation is required for very large wide guard doors because a significant gap may be generated when the opening of the door is detected.
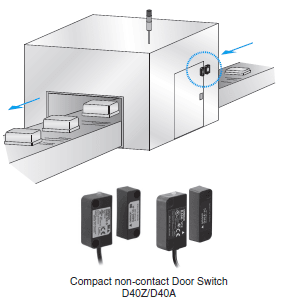
4. Actuation by non-contact method
Non-contact door switches require a dedicated actuator for sensor parts and can prevent the switches from being easily defeated.
These switches do not utilize the mechanical operating method as opposed to the cam operated and/or tongue-actuated switches. As a result, they are unlikely to suffer from the mounting limitation compared to the other switches because of the easy positioning during installation.
Direct and Non-direct Mechanical Action
(A) Non-direct
mechanical action(B) Direct mechanical action (C) Combined action Safety In general, never use non-direct mechanical action switches alone in safety applications. Direct mechanical action switches are recommended when used alone as the switches offer a higher level of safety than non-direct mechanical action switches. Switches in combined operation offer an even higher level of safety than direct mechanical action switches alone. Category B or 1 (using approved parts) B, 1, 2, 3, 4 B, 1, 2, 3, 4 Normal
operationAbnormal
operationNormal
operationAbnormal
operationNormal
operationOperating
statusContacts closed
(guard closed) 
a) No reset due to contact welding
(guard open) 
Contacts closed
(guard closed) 
a) Contact not open due to cam abrasion
(guard open) 
Contacts closed
(guard closed) 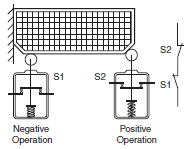
Contacts open
(guard open) 
b) No reset due to spring damage
(guard open) 
Contacts open
(guard open) 
b) Contact not open due to improper cam position
(guard door open) 
Contacts open
(guard open) 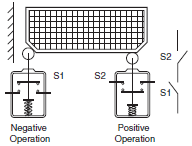
Contact
opening
methodaOpened by built-in spring. Opened directly by externally operating unit like cam or dog. Opened by a combined action. Applicable
contactNO contacts NC contacts (  )
)NO and NC contacts (  )
)Cha-
ra-
cte-
rist-
icsPros The negative operation is a fail-safe operation that ensures safety in case of cam abrasion, improper cam positioning or unexpected cam removal. The actuator forcibly opens contacts if a contact welds or a spring is broken. A combined action eliminates the disadvantages of both modes. Cons The actuator may move accidentally with unexpected force and close the contacts.
The result may be a relatively dangerous situation.There is a danger that contacts may close due to cam abrasion, improper cam positioning or unexpected cam removal. The safety switch circuit may work normally for a while if one of the switches fails to operate.
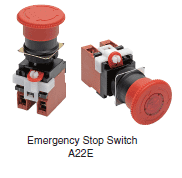
Emergency Stop Device
This is a switch to interrupt machine operations in the event of an emergency.
(1) Emergency Stop Switch
An emergency stop switch is a switch which stops the machinery in the event of an emergency.
1) Types
The following are typical types of emergency stop devices:
• A pushbutton switch
• A pull-cord switch
2) Requirements
• Electric contacts must have a direct opening action.
• Emergency stop devices must have a holding function that will mechanically hold in the stop position until the device is manually reset.
• Actuators of an emergency stop device must be colored red and of a mushroom shape. The background immediately behind the actuator must be colored yellow.
• Consideration must be given to the following items when a wire is used as an actuator.
(1) The amount of deflection needed to generate the emergency stop signal
(2) The maximum deflection possible
(3) The minimum clearance between the wire and the nearest machine in the vicinity
(4) The amount of force required for operation
(5) The ease with which an operator can locate the device, by use of a marker flag or other method
(6) The automatic generation of an emergency stop signal in the event that the wire breaks or becomes detached
Safety Sensor
Safety sensors are used to stop the machinery when detecting an entry or presence of a person during the machine operation.

(1) Trip Function
This function stops the machine when detecting entry of a person.
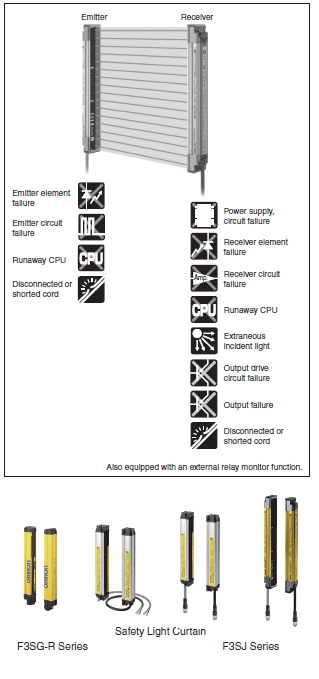
1) Safety Light Curtain
Safety Light Curtain detects operators entering hazard zone by light beams and stops the machine before they are harmed. Unlike ordinary sensors, safety area sensors use a combination of hardware and software to check constantly for internal faults to ensure safe operation.
The following section describes the faults and malfunctions the safety light curtain detects to ensure safety.
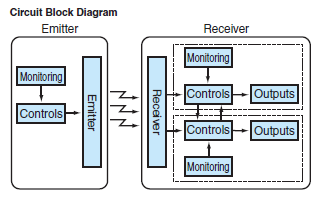
1. Diagnostic system
The safety standards for safety area sensors are the same essential health and safety requirements stipulated for safety in the Machinery Directive, and European standards like IEC 61496 ensure compliance with those requirements. IEC 61496-1 stipulates exactly how type 4 sensor will ensure safety for an accumulation of up to three faults. In the safety light curtain safety was designed in by using dual CPUs that check each other as well as by using redundant signal processing and output circuits. FMEA* was also used to demonstrate safe operation and thus maintain safety.
* FMEA: Failure Mode & Effects Analysis
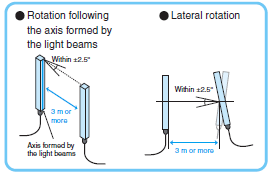
2. Effective Aperture Angle
The effective aperture angle is the angle to which area sensors must be rotated to switch the output from ON to OFF.
A narrower effective aperture angle is required to minimize the influence of optical reflections.
For type 4
| Sensor type | 3.0m | 1.5m | 0.75m | 0.5m |
| Type 2 | 5° | 10° | 19.3° | 27.7° |
| Type 4 | 2.5° | 5° | 10° | 14.7° |
3. Safety Distances
When installing electro-sensitive protective equipment, such as a Safety Light Curtain, the minimum distance that is required to stop the machine before a person who enters the detection zone will reach the machine is stipulated by ISO 13855 and other standards.
• Calculating the minimum distance based on ISO 13855
Minimum distance (S) = Person’s approach speed × response time + additional distance due to the sensor’s detection capability
A. Vertical approach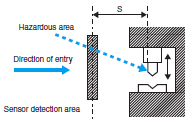 | Finger or hand detection ・ S = (K × T) + 8 (d - 14) d ≤ 40 mm K = 2,000 mm/s (assuming entry speed of finger) T = Machine's maximum stop time + Light Curtain response time (s) d = Light Curtain's minimum detection object value (mm) Note: If S = ≤ 100 mm, S = 100 mm If S = > 500 mm, recalculate with K = 1,600 mm/s If the calculation result is S ≤ 500 mm, S = 500 mm Body detection ・ S = (K × T) + C 40 mm < d ≤ 70 mm K = 1,600 mm/s (assuming person's walking speed) T = Machine's maximum stop time + Light Curtain response time (s) C = 850 mm (assuming entry with an outstretched arm) | |
B. Horizontal approach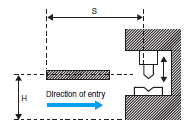 | ・ S = (K × T) + (1,200 - 0.4 H) K = 1,600 mm/s (assuming person's walking speed) T = Machine's maximum stop time + Light Curtain response time (s) H = Light Curtain installation height (mm) Note: 1. H ≥ 15 (d - 50). However H must not exceed 1,000 mm and drop below 0 mm. 2. If H exceeds 300 mm (200 mm for non-industrial applications), there is a danger of someone slipping under. This must be considered in the risk assessment. | |
C. Entry at an angle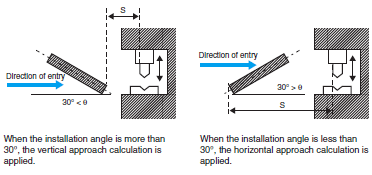 | D. Two-point switching device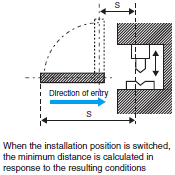 | |
| General formula | S = K × T + C | ||
| A. Vertical approach | d ≤ 40 mm | 100 mm ≤ S ≤ 500 mm | S = (2,000 mm/s × T) + 8 (d - 14 mm) |
| S > 500 mm | S = (1,600 mm/s × T) + 8 (d - 14 mm) | ||
| 40 mm < d ≤ 70 mm | S = (1,600 mm/s × T) + 850 mm | ||
| B. Horizontal approach | S = (1,600 mm/s × T) + (1,200 mm - 0.4 H) | ||
4. Muting Function (IEC 61496-1)
The muting function temporarily stops the detection function of the Safety Light Curtain and automatically keeps it ON regardless of whether the light is incident or tripped.
The muting function can be added to the F3SJ-A/B Safety Light Curtain by attaching a key cap for muting. The F3SG-RA Safety Light Curtain provides this function as standard.
Conventionally when objects such as AGVs or transport pallets passed through the detection area, the work process was stopped by tripping of the Safety Light Curtain each time they passed. With the addition of the muting function, the safety output can be turned OFF only when a person enters the area, while automatically maintaining the safety output when a workpiece passes through. This makes it possible for work to continue without stopping the production line.
However, when muted, the safety detection function is deactivated, which means that it cannot output an OFF signal to the hazard when a person enters the detection area.
Therefore various conditions exist for the methods to install and/or control muting sensors.
Partial muting
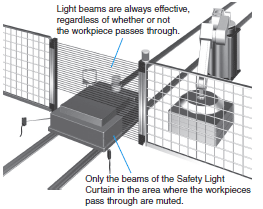
Only the beams in the area where the AVG passes through is defeated, and the safety output is turned OFF only when a person enters the area.
Position detection muting
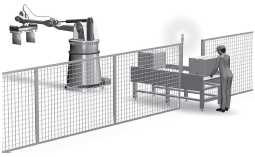
Workpieces can be set without stopping the robot by ensuring that it is in a safe position through detection with a limit switch or others.
5. Blanking function
The blanking function is a function to take out zones from the protection field.
Fixed Blanking
Example:
Invalidating specific beams that are always tripped by the working table.
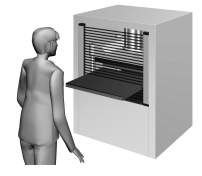
When the tripping objects is fixed:
Possible to be introduced for the machines where the specific objects such as workpieces always trip the light curtain by invalidating the specified beams.
Floating Blanking
Example:
Invalidating beams by the width of workpieces when the beams to be invalidated cannot be specified due to movement up/down of workpieces.
If additional beams are tripped, the output will be turned OFF.
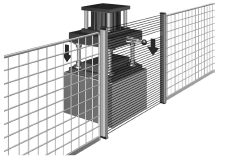
When the tripping objects moves:
Possible to be introduced for the machines where the specific objects such as workpieces interrupt the light curtain by invalidating the specified beams.
(2) Presence Sensing
This function detects the presence of a person and stops the machine until the person escapes from the hazardous area.
1. Basic Safety
Basic safety is broadly classified into the following categories.
(1) Machines and equipment will not start until it is safe to do so.
(2) Machinery will be stopped whenever a hazardous condition is detected.
In order to maintain a safe environment, measures must be employed on one level to detect operators entering or present in a hazardous area and on another level to eliminate hazardous conditions.
2. Safety Requirements
The safety requirements for presence sensing, such as those shown below, are defined by the standards and guidelines of each country.
Guidelines Related to the Comprehensive Safety Standards for Machinery: Ministry of Health, Labor and Welfare
Attached Table 3: Procedure for Safeguarding Against Mechanical Hazards
A device that will detect operators must be installed in a protected area if an operator can pass through an opening and enter that protected area to perform his job.
ANSI/RIA R15.06: US robot-related safety standards Article 10.4.7 Starting and Restarting
When an operator is required to enter a protected area, the operator must be protected from inadvertent starting or restarting of the robot and/or robot system. (Part omitted) If the protected area is clearly marked and the cell cannot start or restart, some means of detecting operators in hidden areas must be provided.
The ideal means would be automatic detection. (Remainder omitted.)
EN 201: European safety standards for injection molding machines
Article 5.3.1
If an operator can fit between the movable guard and the mold, a device that will detect the presence of the operator must be installed there.
3. Safety Distance
When an operator enters a hazardous area, the machine in the area must come to a complete stop before that operator reaches the hazard of the machine.
Safety distance refers to the minimum calculated distance that the protective device must be installed from the hazard of the machine.
1) Safety Laser Scanner
The sensor detects the presence of an operator in dangerous environments.
Detection Methods
• Reflective
Features: Relative freedom in defining protected areas.
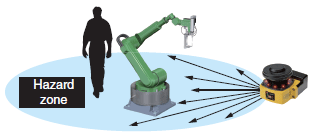
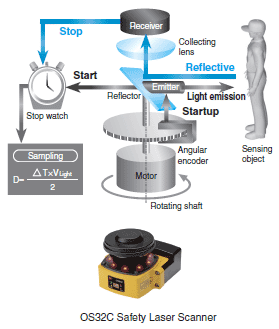
• Active Opto-electronic Protective Device responsive to Diffuse Reflection (IEC 61496-3)
As shown in the figure below, the laser scanner emits a beam that is reflected by surrounding objects. It calculates the distance to the object from the time that it takes to receive the reflected light.
2) Safety Mat
The sensor detects the presence of an operator in dangerous environments.
Detection Methods
• Pressure detection
Features: Excellent environmental resistance
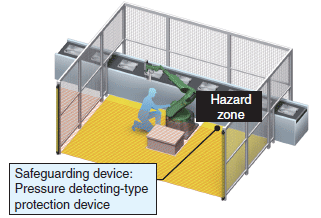
• Pressure detecting-type protection device (ISO 13856-1)
Two plates inside the Safety Mat make contact when an operator steps on the Mat. A Controller detects the contact and generates an output.

Safety Controller
The Safety Controllers receive signals from a safety input device, control whether the machine should be started or not, and notify each device of their determination. They can be broadly categorized into the following four types:
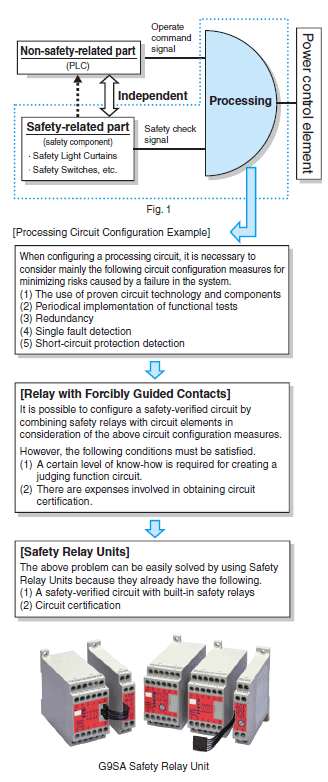
(1) Safety Relay Unit
A typical configuration for the operation control of machinery and equipment is shown in Fig. 1. This is a safety-relay-based control device and suited to single input/single output applications.
• Non-safety-related Parts
The role of non-safety-related parts is to start and continue the operation of devices upon receiving an operate command signal from an automatic control system.
• Safety-related Parts
The role of safety-related parts is to enable operation only when the safety of the machinery and equipment is confirmed.
• Processing
The processing sends an operate signal to a power control element only when it has processed that both the abovementioned operate command signal, which is sent from a nonsafety-related part, and the safety check signal from a safetyrelated part, which confirms the safety of the machinery, allow operation.
• Processing Elements
The processing element cannot be created by simply combining multiple elements.
Its circuit must incorporate elements that will minimize risks caused by a failure in machinery or equipment. These circuit configuration elements typically include items (1) to (5) shown below.
• Necessity of Safety Relay Units
It is possible to configure a safety-verified circuit by incorporating safety relays with forcibly guided contacts.
However, this requires a certain level of technology to configure the circuit and some expense for its certification. As a result, it has become general practice to use standard units that specialized manufacturers have developed by incorporating safety relays. These are provided as a series of Safety Relay Units with proven functional safety.
(2) Flexible Safety Unit
Electronic units are suited to simple relay sequence configurations for single input/single output applications. In addition the following techniques have been used to handle complicated applications (with multiple inputs and outputs) that are difficult for simple relay sequences.
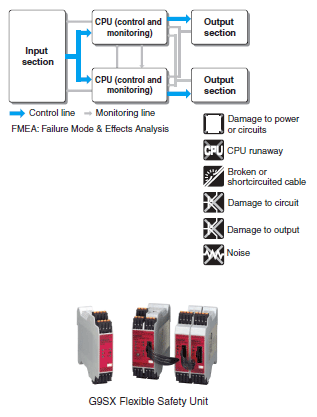
• Dual CPUs
We pursued safety to the limit to deliver safety and reliability backed by the highest level of safety design and FMEA. Two CPU Units perform mutual checking and diagnostic monitoring of each I/O section, and the safety of operations is further verified by FMEA and process-controlled design and production.
• Effective Functions
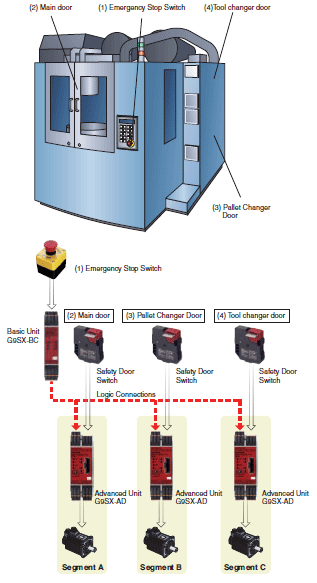
1. Logic Connections
For example, when partially stopping each module of a device as well as stopping the entire device are required, they can be achieved by making the AND logic into a function. The logic connection function allows them to be easily achieved and enables flexible response to applications.
• When the Emergency Stop Switch is pressed, the entire machine will stop.
• When a door is open, the corresponding part will not activate.
(3) Safety Controller
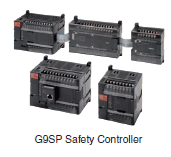
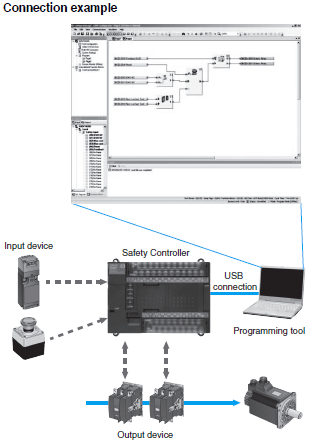
By creating safety programs, the designer can more flexibly handle complex applications.
There are, however, some requirements for safety in programming safety circuits.
1) Preventing User Programming Errors
Safety functions (such as emergency stop buttons and two-hand operating buttons) are provided as verified function blocks to ensure safety at the function block level.
The verification and validation are necessary in addition to the confirmation of the safety of the combination of function blocks to demonstrate final safety as an machinery control system.
2) Preventing Unintended Operation from Incorrect Wiring
External wiring faults are detected, including incorrect wiring, ground faults, short circuits, and disconnection. Internal circuit faults are also detected.
3) Preventing Unintended Settings
Checks are performed to ensure that the parameters input by the user are correctly transferred to and set in the devices before automatically enabling starting.
4) Preventing System Access Except by Administrators
Passwords are set for devices to allow only administrators to change parameters, operating modes, or others aspects of operation.
When designing the safety-related parts, such as equipment and devices, with the programmable safety device, safety validity for software must also be checked.
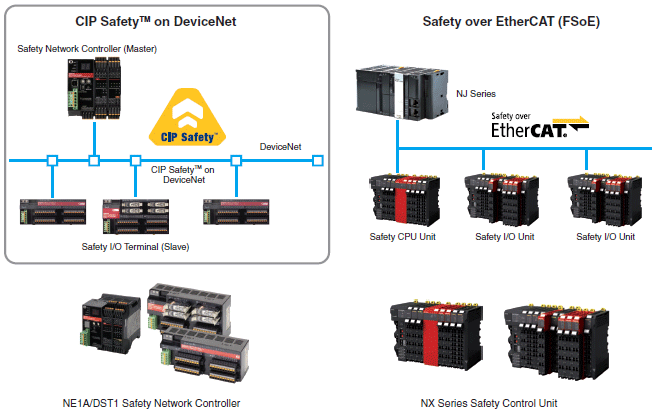
(4) Safety Network Controller
Networking
Creating networks for safety circuits enables applications that require distributing safety devices, as well as expansion of I/O capacity.
The following four measures are taken in implementing safety circuit networks.
(1) Checking Communications Data (System Redundancy)
Redundancy is implemented for safety data by sending inverted data together with safety data and checking response messages sent from destinations to improve safety.
(2) Special Check Code for Safety Data (Safety-CRC)
Check codes called Safety-CRC are attached to the safety data to ensure that any message corruption and/or impersonation are detected.
(3) IDs for Transmitters and Receivers
Mutually monitoring safety devices' unique ID code and/or implementing an unique ID code into the transferred data prevent data communications between incorrect devices.
(4) Data Time Management
Reversed or late communications data are monitored by attaching time stamps by the safety devices to data they send and/or detecting the data reception time by destination nodes of transferred data.
Safety-related Operating Switches
These switches maintains safety areas and/or safe conditions by sending safety signals via controllers through manual operations.
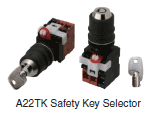
(1) Mode Selector
These switches change the machines from operation mode to maintenance mode during machine maintenance, setup, cleaning and others to ensure the safety of operators.
In IEC 60204-1 (JIS B9960-1), if operation mode is explicitly changed and the safety function and/or safety measures are interrupted, a mode change is required. In this case, the safety of operators suitable for operation mode is ensured by combining with the safety controller.
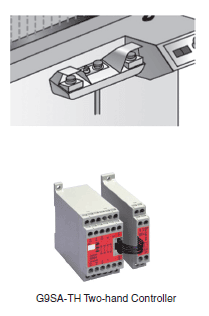
(2) Two-hand Controller
One way to prevent operators from approaching hazardous areas too closely when conditions are hazardous is to install two-hand controllers at specified locations.
In this case a controller supporting two-hand controllers shall be used.
1) Standards for the two-hand controllers: ISO 13851
The guidelines for designing Two-hand Controllers are given in ISO13851. The major safety requirements for Controller design are listed there under Functional Aspects and Principles of Design for Two-hand Controllers.
Note: Conduct actual designing in compliance with the detailed stipulations of ISO 13851.
2) Main Characteristics
The characteristics that must be provided are categorized by type into Type I, Type II, and Type III categories. The major characteristics listed here are Type III characteristics used in Category 3 and 4, as determined by risk assessment.
(1) Two hands must be used together to start up the machine.
(2) Two input signals are required to produce an output signal.
(3) The output signal must turn OFF if either or both input signals turn OFF.
(4) The output signal cannot be restarted until the both signals are turned OFF.
(5) Both input signals must turn ON within 0.5 s to enable synchronous startup output.
(6) Prevention of accidental actuation and of defeat: Refer to Article 3.
3) Preventing Accidental Actuation and of Defeat
1. Prevention of defeat using one hand
The two startup switches must be at least 260 mm (inside dimensions laterally) apart.
Note: A shield must be installed between the two controllers. This does not apply to applications where inadvertent startup prevention is possible.
2. Prevention of defeat using the hand and elbow of the same arm
The two controllers must be at least 550 mm (inside dimensions laterally) apart.
Note: A shield must be installed between the two operation devices. This does not apply to applications where inadvertent startupprevention is possible.
3. Prevention of defeat using the forearm(s) or elbow(s)
Install a cover or enclosure.
4. Prevention of defeat using one hand and any other part of the body
Install the controllers at least 1,100 mm off the floor or from the operating level to prevent operators from employing inadvertent startup prevention with one hand and another part of the body (e.g. knees, hips, etc.).
Note: Safety Distance
The safety distance from the startup switches to the hazardous area must be calculated using factors such as hand and arm speed, response time of the startup switches, and maximum time required to eliminate a hazard according to ISO 13855.
5. Typical Example
Fig. 1 shows a typical example of a Two-hand Controller according to Articles 2) and 3).
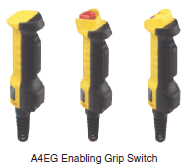
(3) Enabling Switches
An enabling switch is a safety component used so that various hazards such as inadvertent entanglement can be avoided or reduced when performing non-scheduled maintenance work or other non-scheduled operations in hazardous areas, such as those inside safety fences.
When an operator is using a hand-held console with operation switches to teach a robot, retool, or perform maintenance, unexpected movement of a hazard and/or operator's inadvertent behaviors can result in a hazardous state. In a such situation, it's impossible to predict whether the operator will instinctively release the console or will grip it with force.
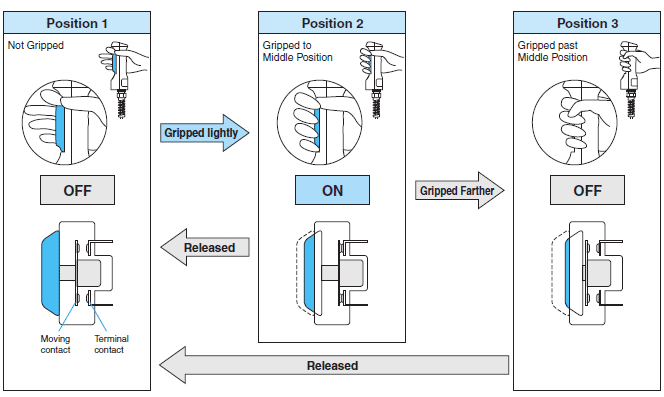
A normal switch thus does not turn OFF when excessive force is applied, which may result in an operator accident. With an Enabling Switch, machines or robots can be controlled only when the switch is gripped lightly to the middle position. If the switch is gripped with force past the middle position or if the switch is released, the machine or robot will be shut OFF, disabling operation.
Enabling Switches are normally used built into teaching pendants, grip switches, and other hand-held controls. They can be combined with safety circuits built with Safety Relay Units and other devices to ensure safety.
1) Structure of Enabling Switches
Enabling Switches operate through three positions: OFF - ON - OFF.
They are OFF when not pressed, ON when pressed to the middle position, and then OFF again when pressed past the middle position.
Three Positions: OFF - ON - OFF
Safety Relays
Unlike other relays, safety relays has the function to detect its welding state and allow determination by the control circuit if contacts are welded together because they have forcibly guided (linked) contacts (EN 50205).
Note: Welding cannot be pulled apart.
1) Main Safety Relay Requirements
The gap between contacts must be at least 0.5 mm during normal operation or when a fault occurs. For more details, see 3).
Contact load switching must conform to AC-15 and DC-13 (IEC 60947-5-1).
The mechanical service life must be at least 10 million operations.
2) Forcibly Guided (Linked) Contact Structure
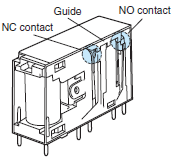
If at least one normally open contact is welded, when the coil is deenergized, all normally closed contacts maintain a gap of at least 0.5 mm.
Even if a normally closed contact is welded, all normally open contacts maintain a gap of at least 0.5 mm in the coil energized mode (in accordance with EN 50205).
Relays in which all the contacts are linked by forced guide are called Type A and indicated by the  mark.
mark.
3) Structural Comparison of General Relays and Relays with Forcibly Guided Contacts
General Relay

G2R Structure
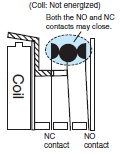
(a) When contact welding occurs
G2R Structure
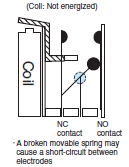
(b) When a movable spring is broken
Relay with Forcibly Guided Contact
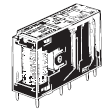
G7SA Structure
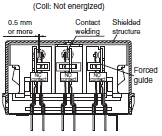
(a) When contact welding occurs in the NO contacts
(The NO contacts will not close if contact welding occurs in the NC contacts.)
G7SA Structure
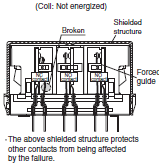
(b) When a contact spring is broken
(broken NC contacts)
Drive Devices Equipped with the Safety Function
The safety functions for drive devices are defined in IEC 61800-5-2. The following figure shows the range of the safety-related parts (PDS (SR)) of the electric-power drive systems.
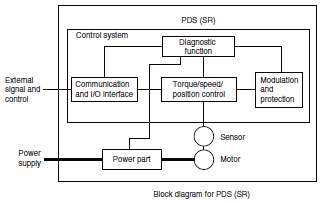
STO (Safe Torque Off) function, which is a typical safety function, is explained here.
As shown in the following figure, STO cuts off the power, which generates turning forces (thrust) of the motor, from the motor.
In STO additional measures, such as mechanical brakes, may be required because the stop state is not controlled. In addition, when a driver/motor should be accessed for maintenance and others, disconnection from the power source using devices such as breaker and contactor is required because STO does not have an electric-shock prevention function.
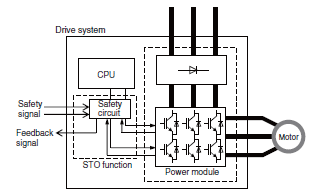
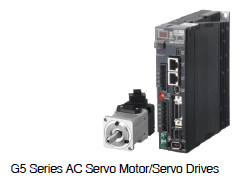
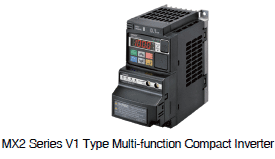
OMRON products implementing STO function
Sysmac is a trademark or registered trademark of OMRON Corporation in Japan and other countries for OMRON factory automation products.
Intel, the Intel logo, Intel Atom are trademarks of Intel Corporation in the U.S. and/or other countries.
Windows, Visual Basic, SQL Server are either registered trademarks or trademarks of Microsoft Corporation in the United Status and/or other countries.
EtherCAT® is registered trademark and patented technology, licensed by Beckhoff Automation GmbH, Germany.
Oracle and Oracle Database are trademarks or registered trademarks of Oracle Corporation and/or its affiliates in the United States and other countries.
Safety over EtherCAT® is registered trademark and patented technology, licensed by Beckhoff Automation GmbH, Germany.
EtherNet/IPTM, CompoNetTM and DeviceNetTM are the trademarks of ODVA.
ATITM, RadeonTM are trademarks of Advanced Micro Devices, Inc. in USA.
NVIDIA and the NVIDIA logo, GeForce, and GeForce logo, are trademarks and/or registered trademarks of NVIDIA Corporation in the U.S. and other countries.
QR Code is registered trademarks of DENSO WAVE INCORPORATED in Japan and in other countries.
Other company names and product names in this document are the trademarks or registered trademarks of their respective companies.


